Dual-booting macOS and Ubuntu requires a little adventurousness, but it’s not too difficult. There can be some problems with the bootloader, though, so we’ll need to deal with that. It’s not too hard to install (and dual-boot) Ubuntu on a Mac.
As a warning, it’s way more efficient to run Ubuntu on a virtual machine using VMWare. If for some reason this doesn’t work for you, dual booting should be your second option. Just a warning: some hardware functionality might never work right under Ubuntu. Macs can be weird under Linux, so only proceed if you possess the patience and technical know-how for troubleshooting.
With all that accomplished, we are finally ready to install Ubuntu on our Mac! Unfortunately, high-quality screenshots were not available for these steps.
Booting from the USB
1. Reboot your Mac.
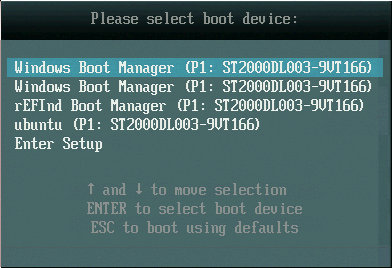
2. Select your USB drive in rEFInd to boot from it.
Running the Ubuntu Installer
1. Connect to your wireless network (if you can) and choose to install third-party software.
2. At the installation selection screen, choose “Something Else” from the bottom.
3. Select the partition you created earlier. Click the “–” button to delete it.
4. With the free space selected, click the “+” to create a new partition.
5. Set the size to 4000 MB and “Use as” to “swap.”
6. Create another new partition with the “+” button. Use all the available free space. Set “Use as” to “Ext4 journaling file system.” Set the mount point to “/.”
7. Choose the ext4 partition under “device for bootloader installation.”
8. Click through the remaining steps to create your user and finish the installation.
Setting Up Boot Order
Upon completion, your Mac will likely boot into Ubuntu automatically. If so, the GRUB bootloader has taken over: we need to reassert rEFInd’s control. Follow the instructions in this guide to use efibootmgr from within Ubuntu to solve the problem.
There might be a shortcut, though. If you only have rEFInd and Ubuntu installed, this Ubuntu Terminal command should set you right. However, circumstances vary, so don’t just run it blindly:
sudo efibootmgr -o 0000,0080
Conclusion: After Installation
You likely need to install additional drivers and software specifically for your Mac model. The best advice is to search out appropriate drivers and software changes for your hardware in particular.
Originally written: 4/24/2016; last Web page update: 11/12/2018, referencing rEFInd 0.11.4
This Web page is provided free of charge and with no annoying outside ads; however, I did take time to prepare it, and Web hosting does cost money. If you find this Web page useful, please consider making a small donation to help keep this site up and running. Thanks!
Donate $1.00
Donate $2.50
Donate $5.00
Donate $10.00
Donate $20.00
Donate another value
This page is part of the documentation for the rEFInd boot manager. If a Web search has brought you here, you may want to start at the main page.
Once you’ve installed rEFInd, you may face a new challenge: Keeping it set as your default boot manager. Users of multi-boot computers have long faced similar challenges, because most OSes provide mechanisms to keep themselves booting, even at the cost of disrupting other OSes—or overriding your own choices. On this page, I refer to such unwanted changes as boot coups. Experienced multi-booters know the tools and techniques to avoid or recover from boot coups. If you’re new to the EFI world, though, most of the techniques you may know for helping with BIOS-mode booting don’t apply to EFI-mode booting.
This page describes tools and techniques you can use to keep rEFInd set as your default boot manager, or at least to recover it as the default boot option if something else takes over. This page is organized by OS, describing the tools and techniques you can use in each OS to recover from a boot coup—or in some cases, to prevent one from occurring. I begin and end with information on firmware-based tools, though. Chances are you should not read this page straight through; instead, peruse the Contents to the left and pick an OS and, perhaps, a recovery tool or technique you wish to pursue and read the relevant section. In most cases, the recovery technique is fairly quick and painless, once you understand how to do it. Note also that, in extreme cases, a full rEFInd re-installation may be required. This will be true if something has completely deleted rEFInd’s NVRAM entry. It may also be easier to re-run refind-install than to learn about esoteric commands such as efibootmgr, bless, or bcdedit.
Evading the Guards: Performing a One-Time Boot to Your Desired OS
Most EFIs provide their own built-in boot managers. These tools are primitive, and in some cases they can be difficult to reach, but they can be useful if you need to bypass a new system default in order to boot an OS that has the tools you need to control the boot process.
On Macs, holding the Option key (or Alt with a PC keyboard) brings up the Mac’s boot manager. Typically, the Esc key, Enter key, or a function key (usually F8 or above) does the job on UEFI-based PCs. Some computers provide a prompt for what key to use to access the boot menu, but this isn’t always true. Sometimes the keyboard is disabled in the early stages of the boot process by default—part of a strategy to speed up system boots. Disabling a “fast start” feature in the firmware may work around this problem. Getting into the firmware can be a challenge on such computers, though. Microsoft provides a way to do this in Windows 8 and later; see this How-To Geek article for documentation on how to use this feature. If a Linux distribution uses the popular systemd initialization system, you can type systemctl reboot –firmware as root (or using sudo) to do the same from Linux.
Once you’ve found the built-in boot manager, you’ll see its display, which is typically a text-mode listing of boot options. On UEFI-based PCs, the user interface is typically similar to the one used in years past on BIOS-based computers to select the boot device; it’s simply been upgraded to include the descriptions held in NVRAM for specific boot loaders. (In fact, prompts are often outdated and misleading; as in the below example, they may refer to “boot devices,” when in fact most of the options are EFI boot loader programs, not hardware devices.) As an example, an ASUS P8 H77-I’s boot manager looks like this:
You typically select the option you want to boot by using the arrow keys, then hit the Enter key to boot it. If rEFInd is working but has been overridden as the default, you can select it; or if your preferred OS has its own option, you may be able to launch it directly.
Keep in mind, though, that some of the options on the built-in boot manager’s menu may not work, or may work in unexpected ways. For instance, you might see options to boot hard disks in BIOS/CSM/legacy mode. These options might not work; and even if they do, they’ll boot the computer in BIOS mode, so you won’t be able to use the tools described on this page to correct your boot problems.
Staging a Counter-Revolution: Re-Installing rEFInd
The most general, and in some cases the easiest, solution to a boot coup is to re-install rEFInd. If you haven’t updated rEFInd in a while, this approach has the advantage of providing an update to rEFInd (assuming you first download the latest version). The Installing rEFInd page describes how to install rEFInd from Linux, macOS, Windows, or an EFI shell. The refind-install script preserves your existing refind.conf configuration file, so an upgrade should not affect your customizations. (The rEFInd icons will be updated to the latest versions, but refind-install moves the original icons to a backup directory, so you can restore them if you’ve customized them or if they’ve changed and you don’t like the new icons.)
One possible complication to this approach is if you’re stuck booting in an unfamiliar OS. In such a case, you may be able to boot into your preferred OS on a one-time basis by using your computer’s built-in boot manager, as described in the previous section. The trouble is that how you do this varies greatly from one computer to another.
Recovering from a Coup Using Linux
Linux’s primary tool for adjusting the EFI boot order is efibootmgr. If you installed rEFInd from Linux, chances are you used this tool, even if you don’t realize it. (The refind-install script calls efibootmgr, and this script is called automatically by the rEFInd RPM and Debian packages). The easiest way to do this is to use the refind-mkdefault script. A more complex but flexible approach is to use efibootmgrdirectly. I also describe some steps you can take to make it less likely that Linux will stage a boot coup to begin with, thus obviating the need to perform a repair.
Using refind-mkdefault to Adjust Your Boot Priority
Since version 0.10.3, rEFInd has shipped with a script called refind-mkdefault, which uses efibootmgr to identify rEFInd and set it as the default (first) boot option. Use of this script is quite simple: Launch it as root (or via sudo):
$ sudo refind-mkdefault
rEFInd is not the first boot entry; adjusting....
Setting a boot order of 0000,0002,0085,0003
The exact output of the script depends on the current state of the system; it might also respond that rEFInd is already the default boot entry or that it could not identify a rEFInd entry, for instance. The boot order shown in this example is meaningless by itself; it’s the boot order as identified by efibootmgr; for details, see the next section.
Instead of using refind-mkdefault manually, you might consider running it automatically at every boot or shutdown. You can, for instance, call it from /etc/rc.local or create a script in /etc/rc6.d that calls it to have it run when you start up or shut down the computer, respectively. Details, however, vary from one distribution to another, so you should consult your distribution’s documentation for details. If you use it in this way, rEFInd should correct a boot coup caused by an update to GRUB; however, this repair will happen only after a reboot if you call refind-mkdefault in a startup script. If you call it from a shutdown script, rEFInd should correct such a coup before it has a chance to cause problems; but then it won’t run if the computer crashes. Note that refind-mkdefault does not touch the NVRAM variables if rEFInd is already the default boot option. Thus, calling this script as a regular part of your startup or shutdown procedure poses little risk of causing problems. If you decide to stop using rEFInd, though, you’ll have to remember to remove the call to refind-mkdefault from your startup and shutdown scripts.
If you’ve given the rEFInd entry an unusual name, you can pass the script the -L name or –label name option, as in:
$ sudo refind-mkdefault -L ubuntu
This example moves an entry that contains the string ubuntu (case-insensitive) to the top of the boot order. Thus, refind-mkdefault can set any boot program as the default, so long as it’s already registered with the firmware. The script searches the entirety of output lines created by efibootmgr -v (as described shortly), and so it matches on descriptions, filenames, and even the obscure EFI codes that identify devices.
Using efibootmgr to Adjust Your Boot Priority
Adjusting your boot order using efibootmgr is a two-step process: First you must identify the existing boot entries. With that done, you specify a new boot order. You can identify boot entries by typing efibootmgr alone (as root or via sudo):
In this example, labels were clear and accurate; you can see that the BootOrder line identifies a boot order of Boot0002 (Windows) followed by Boot0000 (rEFInd), then various others. If you’re in doubt about your entries, you can examine more complete output with efibootmgr -v:
Much of this output looks like gibberish, and is useful only for very advanced diagnostics. Note, however, the part of most lines that specifies a filename, in parentheses after File—this information can help disambiguate a misleading or duplicate name. In this example, for instance, there are two Windows Boot Manager entries on two different partitions; each boots a different version of Windows.
To adjust the boot order, you must identify the rEFInd entry and then use the -o option to efibootmgr to adjust the order:
In this example, I moved rEFInd to the top of the list, followed by ubuntu (GRUB) and then the two Windows installations. You can adjust the order in any way you want. You can also omit items you don’t want to include—but be aware that if you omit Windows entirely from the boot list, it’s likely to add itself back (at the top of the list) the next time you boot it.
Preventing a Linux Coup by Disabling GRUB Updates
Once Linux is installed, the usual cause of a Linux boot coup is an update of GRUB. Such updates are relatively rare, but they can happen at any time when the distribution maintainer pushes out a version of GRUB with a bug fix. Therefore, one way to prevent a Linux boot coup is to disable such updates. Unfortunately, the details of how to do this vary from one distribution to another. Furthermore, disabling such updates has its drawbacks.
One problem with disabling GRUB updates is that you’ll be cut off from the benefits they bring—GRUB updates are normally distributed because they contain important bug fixes. These updates might even be security-related. Of course, if you’re booting via rEFInd without involving GRUB, you may not care about such updates. This possibility suggests the first way to disable GRUB updates: Remove GRUB entirely.
To remove GRUB, you must employ your package management system. For instance, on an RPM-based system, you might type:
# rpm -e grub2 grub2-efi grub2-tools
On a system that uses Debian packages, a similar command is:
The details of what packages you must remove vary from one distribution to another, though. (The preceding examples are from Fedora and Ubuntu installations.) If you’re unsure what packages to remove, you may need to use your package management tools to track down all GRUB-related packages. GUI tools, such as Yumex for Fedora and Synaptic for Debian-based systems, can be very helpful in this task. Unfortunately, you must sometimes remove packages that you might not want to remove—for instance, the preceding example removes shim-signed from Ubuntu because shim-signed contains a dependency on GRUB, but rEFInd can use Shim for its Secure Boot support. Fortunately, if rEFInd is already booting via Shim, removing the shim-signed package will not remove the shimx64.efi binary from rEFInd’s directory, so the system will continue to boot—but you also won’t receive any Shim updates that might roll along.
Note also that removing the GRUB packages will not remove the files installed to the EFI System Partition (ESP), so rEFInd will continue to show a GRUB option, normally with an icon for your distribution, in its main menu. If you want to remove that menu entry, you can delete the relevant files, normally from /boot/efi/EFI/distribution_name.
An added bonus to removing the GRUB packages is that you will no longer have to wait while GRUB’s scripts scan your system every time your kernel updates. (Such scans can take well over a minute on a system with lots of installed OSes, which can be quite annoying.) Of course, these scans keep the GRUB menu up-to-date, so if they stop, GRUB will eventually stop working, even if you leave its binaries installed on your ESP.
One limitation to removing GRUB packages is that your distribution may try to re-install GRUB. As a workaround for Ubuntu systems, I use this dummy package, which claims to be “GRUB 3″—a version high enough that no GRUB 2 update should ever try to displace it. My “GRUB 3” dummy package contains nothing but a few empty directories.
A less radical approach to preventing boot coups related to GRUB updates is to use your packaging system to lock the current version in place. You can do this with Debian-based installations with the apt-mark hold command, as in:
# apt-mark hold grub-efi-amd64 grub-efi-amd64-signed grub-common grub-efi-amd64-bin \
  grub-common grub2-common
You can achieve a similar result in Fedora by installing the yum-plugin-versionlock package, ensuring that enabled = 1 is set in /etc/yum/pluginconf.d/versionlock.conf, and editing /etc/yum/pluginconf.d/versionlock.list to include the names and versions of packages you want to lock at a particular version.
Recovering from a Coup Using MacOS
A boot coup that leaves a computer booting straight to macOS was most likely caused by an update to macOS—either a software update that installed a fresh copy of the macOS boot loader or a complete re-installation of the OS. In either event, the solution is conceptually similar to the Linux solution, but the tools you use to correct the problem differ. In macOS, you would either use Startup Disk to set rEFInd as the default or use bless to do the same.
Using Startup Disk to Adjust Your Boot Priority
The Startup Disk utility appears in the System Preferences tool. Unfortunately, it will likely be useless if you installed rEFInd using refind-install and its default options, since Startup Disk is designed to switch between macOS installations; it’s not smart enough to detect a rEFInd installation and re-activate it.
If, however, you installed rEFInd by using the –ownhfs option to refind-install, your rEFInd installation volume should show up as an option in the Startup Disk utility. You should be able to click on it and then click Restart. Note that the name of the rEFInd volume may not be rEFInd, as it is in this screen shot; the name will match whatever volume holds rEFInd on your computer.
As with most of the fixes described on this page, this method of recovering from a boot coup will not protect you from future boot coups. Fortunately, macOS updates that create boot coups are fairly rare, but you’ll have to resign yourself to the fact that the problem may recur in the future.
Using bless to Adjust Your Boot Priority
The more general solution to resetting rEFInd as the default boot manager from macOS is to follow a subset of the manual macOS installation instructions. Unfortunately, some details depend on where rEFInd is installed—on the ESP, on the main macOS root (/) partition, or on a separate HFS+ volume. If rEFInd is installed on its own HFS+ partition, using Startup Disk, as described in the previous section, is likely to be the easier solution. For the other two options, you should first figure out where rEFInd is installed and then follow this procedure:
Open a Terminal window in which you’ll type the following commands.
If rEFInd is installed on your ESP, you must first mount it. The easy way to do this is to use the mountesp script that comes with rEFInd. When you run it, the script should tell you where the ESP was mounted. You can do the job manually by typing mkdir /Volumes/ESP followed by sudo mount -t msdos /dev/disk0s1 /Volumes/ESP. Note that you may need to change /dev/disk0s1 to something else if your ESP is at an unusual location. Type diskutil list or use a tool such as my GPT fdisk (gdisk) to examine your partition table to find your ESP if necessary.
“Bless” rEFInd by typing one of the following two commands:
If rEFInd is installed on the ESP, type sudo bless –mount /Volumes/ESP –setBoot –file /Volumes/ESP/efi/refind/refind_x64.efi –shortform, adjusting the mount point and exact path to the file as appropriate for your installation.
If rEFInd is installed on an ordinary HFS+ volume, type sudo bless –setBoot –folder /efi/refind –file /efi/refind/refind_x64.efi. (Adjust the path and filename as necessary if you’re placing rEFInd somewhere else or using the 32-bit version.)
One major caveat is that the bless command will fail if System Integrity Protection (SIP) is active. This feature is part of OS X 10.11 (El Capitan) and later, and you will have dealt with it during rEFInd installation if it’s active. See this page of the rEFInd documentation for more on this subject. You can use any of the procedures outlined there with reference to installing rEFInd for dealing with a boot coup, as well.
As with most of the fixes described on this page, this method of recovering from a boot coup will not protect you from future boot coups. Fortunately, macOS updates that create boot coups are fairly rare, but you’ll have to resign yourself to the fact that the problem may recur in the future.
Recovering from a Coup Using Windows
A couple of tools exist to help you manage the boot order in Windows. The easiest of these to use is the third-party EasyUEFI. Microsoft’s bcdedit, though, has the advantage of working around a problem in which Windows keeps setting its own boot manager as the default. (This problem is rare, but crops up from time to time.)
Using EasyUEFI to Adjust Your Boot Priority
The third-party EasyUEFI program is a user-friendly GUI tool for managing EFI boot entries. If a Windows update resets Windows as the default boot program, you can use EasyUEFI to restore rEFInd as the default. Doing so is pretty straightforward:
Download and install EasyUEFI.
Launch EasyUEFI. The resulting display will look something like this:
Click the rEFInd entry.
Click the green up-arrow button (at the top of the column of icons between the Boot order and Detailed information panes) as many times as needed to bring rEFInd to the top of the list.
Exit from EasyUEFI. Alternatively, you can select the Power -> Reboot menu entry to reboot and test the change immediately.
Note that EasyUEFI’s menu shows the names of the boot entries. In some cases, rEFInd may be registered under another name. This is particularly likely if you used macOS’s bless or Windows’ bcdedit tools to register rEFInd with the firmware. You may be able to locate the rEFInd binary by examining the File path entry in the Detailed information pane, after selecting a “candidate” entry.
Like most of the remedies described on this page, this one makes an immediate change to the boot order but does not guarantee that the problem will not recur. In most cases, rEFInd will remain the primary boot program until it’s changed again by another OS update, but all bets are off when that happens.
Locate Command Prompt in the Start menu, right-click it, and select Run as Administrator. This action opens a Command Prompt window with administrative privileges.
Type bcdedit /set “{bootmgr}” path \EFI\refind\refind_x64.efi to set rEFInd as the default EFI boot program. Note that “{bootmgr}” is entered as such; that’s not a notation for a variable. Also, change refind_x64.efi to refind_ia32.efi on systems with 32-bit EFIs. Such computers are rare, and most of them are tablets. Check your Windows bit depth to determine which binary you should use. If you use Shim or PreLoader to boot with Secure Boot active, you should change the name of the binary appropriately.
If you like, type bcdedit /set “{bootmgr}” description “rEFInd description“ to set a description (change rEFInd description as you see fit).
This procedure, unlike the EasyUEFI one, creates a new boot menu item. It requires that you know the exact path to the rEFInd binary. (If you don’t know this detail, you can mount your ESP, as described in the Windows installation instructions, and try to find it.) Overall, it’s likely to be easier to use EasyUEFI; however, this procedure has one potential advantage: I’ve seen reports of cases in which Windows changes the default boot program on every boot. This procedure sometimes puts an end to such shenanigans. Thus, it can serve as a preventive measure against at least some future boot coups. I can’t promise that it will work in all such cases, though. In particular, some EFIs, especially older ones, are buggy and ignore or forget their entries. Using bcdedit will not help protect against this problem.
Using Your Firmware to Repair a Boot Coup
If a boot coup has left your computer unbootable, or if the OS to which you’re booting provides poor or non-functional tools for repairing a boot coup, you may be able to use your firmware to fix the problem. There are two basic approaches to doing so: using built-in firmware features (which may or may not be present, depending on your computer) and using an EFI shell (which may or may not be installed on your computer).
Using Built-in Firmware Features to Adjust Your Boot Priority
Some, but not all, EFIs provide the means to adjust the boot order themselves. The details of how this works vary greatly from one implementation to another, so I can provide only fairly broad guidance on this point. As an example, consider how to adjust the boot order with the ASUS P8 H77-I motherboard:
Turn on the computer.
As the computer begins its Power-On Self-Test (POST), there will be a brief window in which you can hit the F2 or Del key to enter the firmware setup utility. Do so.
In the “EZ-Mode” menu shown below, the boot order is shown graphically near the bottom of the screen. As you move the mouse over the entries, you’ll see an expansion of each one. In the screen shot below, the second item is highlighted, and you can see it’s rEFInd.
Click and drag the rEFInd entry to move it to the front of the list (all the way to the left).
Hit F10 to save your changes. A dialog box will ask for confirmation; click Save Changes & Reset.
This procedure is only an example for one EFI. In fact, some EFIs, including the one in the ASUS P8 H77-I, feature multiple user interface modes. The ASUS has an “Advanced” mode, for instance, in which the procedure would be slightly different. They key point, though, is to locate whatever menu displays the boot order and use that menu to adjust it. Such a menu may be shown on the main screen, as in the case of the ASUS’ “EZ-Mode,” or on a menu you must select—often called “Boot” or something similar. Some EFIs, particularly for low-end fully-assembled desktop and laptop computers, lack this functionality altogether.
As with most other fixes described on this page, this one won’t protect you from future boot coups. Most boot coups are caused by actions of an OS, so prevention must be handled on an OS-by-OS basis.
Using an EFI Shell to Adjust Your Boot Priority
Version 2 of the EFI shell provides a command, bcfg, which can adjust the EFI boot order. Unfortunately, this tool is not present in version 1 of the EFI shell, and version 2 is reliable only with EFI version 2.3 and later. To date (mid-2017), all Intel-based Macs use EFI 1.1, and many PCs sold prior to Windows 8’s release use UEFI (EFI 2.x) versions prior to 2.3. Thus, this approach may not work for you.
Even if your computer works with a version 2 shell, it may not have one built in. In fact, most EFIs I’ve seen lack a built-in shell. If a shell is available, it should appear on the EFI’s built-in boot manager, as described earlier, in Evading the Guards: Performing a One-Time Boot to Your Desired OS. If a shell is not built into your firmware, you can add one; here are a few links that may be helpful:
Note: You can use an OS other than Linux to prepare the EFI shell boot disk, but you’ll need to adjust the commands appropriately.
If you need to use the shell to overcome a boot coup, your best bet is to install it to a USB flash drive and boot from it. You can do so as follows in Linux:
Prepare a USB flash drive with a FAT filesystem. Depending on your firmware, it may need to use GPT and the partition may need to be marked as an EFI System Partition (ESP)—that is, with a type code of EF00 in gdisk or with its “boot flag” set in parted or GParted.
Mount the USB flash drive. In this procedure, I assume it’s mounted at /mnt. If you mount it elsewhere, adjust the following commands appropriately.
Type mkdir -p /mnt/EFI/BOOT to create the EFI/BOOT directory on the USB drive.
Copy the shell binary you downloaded to /mnt/EFI/BOOT/bootx64.efi (for a system with a 64-bit EFI) or to /mnt/EFI/BOOT/bootia32.efi (for a system with a 32-bit EFI).
Unmount the USB drive.
At this point, you should have a working USB flash drive with an EFI shell. It should show up in your computer’s built-in boot manager, as described earlier, in Evading the Guards: Performing a One-Time Boot to Your Desired OS. It will probably appear there under the brand name of the USB drive, perhaps with “UEFI” in the description. (If the boot medium shows up twice, select the option that includes “UEFI” in the description.) One major caveat is that the EFI shell is not signed with a Secure Boot key, so to use it on a computer with Secure Boot active, you must disable Secure Boot.
Type bcfg boot dump -b to see a list of existing NVRAM entries. Pay attention to their numbers (labelled Option: and Variable:, with the latter number preceded by the string Boot, as in Boot0007). Look for the existing rEFInd entry.
Type bcfg boot mv # 0, substituting the option number for the rEFInd entry you identified for #. This moves rEFInd to the top of the boot order.
Type reset to reboot the computer.
Tip: If you install the EFI shell as EFI/tools/shell.efi or EFI/tools/shellx64.efi (on x86-64 systems; EFI/TOOLS/shellia32.efi on IA-32 systems) on your hard disk’s ESP, rEFInd will detect it and enable you to boot it from rEFInd. If you register the shell with the firmware’s boot manager, you’ll be able to launch it that way without using a USB flash drive.
With any luck, rEFInd will be restored as the default boot manager at this point. As with most of the methods described on this page, this procedure will do nothing to prevent future boot coups, so you may need to repeat the process in the future.
Because of the complexity of the procedure for starting an EFI shell if one is not already prepared, this procedure works best if one is built into your EFI or if you already have one ready.
The Unstable State: Dealing With Persistent Boot Coups
If your computer simply refuses to boot into rEFInd, chances are your firmware is either ignoring its boot entries or forgetting them. For the most part, which is the case doesn’t really matter, since the solutions are similar for both cases. There are a few obscure exceptions, though; for instance, an entry will be ignored if it’s malformed—such as if the filename specification includes a typo. Also, there is at least one known bug that causes the computer to ignore boot loader entries except for those named “Windows Boot Manager” or “Red Hat Enterprise Linux.” Such problems can be fixed by creating a fresh NVRAM entry for rEFInd that fix the typo or give the entry the name that the EFI expects (even if it’s a misleading name).
More common are problems in which the firmware ignores or forgets its boot entries. Such problems used to be quite common, but are becoming rarer as manufacturers (slowly) improve their products. My general advice for fixing such problems is to attempt each of the following, in more-or-less the stated order:
Upgrade your firmware. Go to the manufacturer’s Web page and search for a firmware update. (Most manufacturers call these “BIOS updates.”) After you apply the update, you may need to add the rEFInd entry back (re-installing it will do so).
Reset your firmware settings to their default values. Most EFIs provide an option to do this. The idea is that corrupted settings may be causing the firmware to misbehave, so resetting everything to factory defaults may work around the problem. You may need to re-install rEFInd, or at least re-create its NVRAM entry.
Use another tool. The Linux efibootmgr tool sometimes doesn’t work correctly even when another tool does work. As noted earlier, the Windows bcdedit program can overcome some persistent problems related to Windows; and the EFI shell’s bcfg works better than efibootmgr on a small number of EFIs.
Return the computer for a refund. If none of the preceding steps works, chances are your firmware is just plain defective. Note that by “defective” I mean “defective by design,” not a sample defect, so you should not exchange the computer for another of the same model. (Indeed, even another model of the same brand may suffer from the same problem.) Your best bet in this case is to return the product to the store for a refund and write to the manufacturer about the problem. Manufacturers will not fix problems that they don’t know exist, so informing them of the problem is important. Unfortunately, many people learn of such problems only after having owned a computer for months, so a return is not always practical….
Use a fallback filename. You can use mvrefind in Linux to rename rEFInd to use either of two fallback filenames:
Type mvrefind /boot/efi/EFI/refind /boot/efi/EFI/BOOT to rename rEFInd to use the official EFI fallback filename of EFI/BOOT/bootx64.efi. (Change /boot/efi to the ESP’s mount point if it’s something else.) This location works well if you’re single-booting Linux, or booting multiple Linux distributions.
Type mvrefind /boot/efi/EFI/refind /boot/efi/EFI/Microsoft/Boot to rename the Microsoft boot loader as a backup filename and to rename rEFInd as the Microsoft boot loader (EFI/Microsoft/Boot/bootmgfw.efi). This is a somewhat confusing hack, but it’s necessary on some very badly broken EFIs, particularly if you’re dual-booting Windows and another OS. Unfortunately, Windows might, quite reasonably, replace rEFInd with a fresh copy of its own boot loader if a system update provides a new boot loader, or even for other reasons. Thus, you might need to re-install rEFInd and repeat this hack at some point in the future.
You can perform these actions in another OS, too, but you’ll need to do so manually. See the Renaming Files Manually section of the rEFInd installation page for details. If you upgrade rEFInd in the future, the refind-install script should detect rEFInd at its altered location and upgrade it there, so you should not need to repeat this step after a future rEFInd upgrade.
Persistent boot coups may also be related to OS actions. As noted earlier, Windows will sometimes cause repeated problems, which can usually be fixed via bcdedit. Repeated problems in Linux can be caused by by frequent GRUB updates or by a combination of bad NVRAM handling and the fallback.efi program. If GRUB is updating so frequently that’s it’s causing annoyance, it can be dealt with by use of refind-mkdefault in a startup or shutdown script or by disabling GRUB updates. If fallback.efi is causing you grief, read the following section for information on how to reconfigure it.
Another thing that can produce symptoms similar to a persistent boot coup is Secure Boot. If Secure Boot is enabled on your computer and you install rEFInd without a Shim or PreLoader program, your computer will probably refuse to launch rEFInd. In this case, inserting Shim or PreLoader into the boot process, as described on the rEFInd Secure Boot page, normally overcomes this problem. On rare occasions, though, Shim or PreLoader won’t work with a particular computer. In such a case, you may need to disable Secure Boot. Note that this level of Secure Boot malfunction is quite rare. I see many posts in online forums that jump to the conclusion that Secure Boot is causing a problem, when in fact there’s another more likely cause. Thus, I urge you to investigate other possibilities before concluding that Secure Boot is causing an inability to boot rEFInd.
Managing Boot Coups with fallback.efi/fbx86.efi
One type of boot problem is similar to a boot coup, but has a unique cause: Some EFIs, especially older ones (mostly from 2012 or earlier) have a tendency to forget their NVRAM entries. Such computers boot from the fallback boot loader (EFI/BOOT/bootx64.efi) or from the Microsoft boot loader (EFI/Microsoft/Boot/bootmgfw.efi), but that’s about it. A similar problem is that some computers remove invalid boot entries from their boot lists. This is helpful if you delete a boot loader, but it’s less than helpful if you temporarily unplug your boot disk and then plug it back in.
In either of these cases, your computer may boot to an unwanted OS or completely fail to boot. One solution to this problem is to install rEFInd to the fallback filename, as described earlier, in The Unstable State: Dealing With Persistent Boot Coups. Another is to use an EFI program called fallback.efi, fbx64.efi, or an equivalent filename on other platforms. To use this program, you would install it to EFI/BOOTon the ESP, either renaming it to bootx64.efi (that is, fallback.efi uses the fallback filename) or installing Shim as bootx64.efi. Shim will try to launch fallback.efi or fbx64.efi when it boots, so either way, this program will launch. (Be sure to match your Shim and fallback.efi/fbx864.efi binaries, so that Shim launches the correct program!) For simplicity, I call this program fallback.efi hereafter.
When fallback.efi launches, it reads every subdirectory of EFI on the ESP except for EFI/BOOT and looks for a file called BOOT.CSV. If this file exists and contains a UCS-2 (UTF-16 also seems to work) text file, that file is read and used to create a new NVRAM boot variable. The format of BOOT.CSV is simple; it consists of one or more lines, each of which consists of four comma-separated fields:
filename—This is the filename of the file, in the same directory as BOOT.CSV, to be added to the NVRAM-based boot list.
label—This is the label to be associated with the file. This label is displayed by the firmware’s own built-in boot manager.
options—If the boot loader requires options, you’d specify them here. rEFInd doesn’t normally take options, so this field is likely to be empty.
description—This field describes the entry. It’s not used by fallback.efi; it exists solely for human consumption.
An example BOOT.CSV file for rEFInd might look like this:
refind_x64.efi,rEFInd,,This is the boot entry for rEFInd
This example is suitable for use with rEFInd if Secure Boot is not in use. (If you’re using Secure Boot with Shim, you’d probably specify shimx64.efi rather than refind_x64.efi in this file and give rEFInd the filename grubx64.efi.) This example adds an entry for refind_x64.efi, with a label of rEFInd, to the NVRAM-based boot order list.
One key point is that this file must be a UCS-2 or UTF-16 file. Most Linux (and Windows and macOS) text editors create ASCII files by default. You can use iconv to convert to an appropriate format. For instance, suppose you have an ASCII file called boot.csv in your home directory and you want to write it to /boot/efi/EFI/refind as a UCS-2 file. You could do so in two steps as follows:
Depending on permissions on your ESP and the account you use, you could do the same thing in a single step by writing directly to the ESP.
Note that fallback.efi can create boot coups, in addition to fixing them. If it’s run inappropriately, this program can modify your NVRAM-based boot list, causing something you don’t want to run to become the default boot loader. Thus, if you’re experiencing boot coups, you may want to check for the presence of this program and either delete it or adjust the BOOT.CSV files on your ESP. You can find all the BOOT.CSVfiles as follows, assuming the ESP is mounted at /boot/efi:
$ find /boot/efi -iname BOOT.CSV
By default, Fedora and its relatives install fallback.efi in the fallback position (typically launched by Shim, actually) and set up a BOOT.CSV file in the directory that holds the distribution’s GRUB. This is good for keeping Fedora booting, but if you want to boot with rEFInd, this configuration can result in a boot coup should the fallback boot loader run for any reason. One way to fix such a problem is to delete or rename BOOT.CSV in the GRUB boot loader’s directory and create a suitable BOOT.CSV in the rEFInd directory on the ESP. The refind-install and mvrefind scripts in rEFInd 0.11.0 and later create such a file automatically. This file is harmless if fallback.efi never runs.
Note that fallback.efi does not guarantee the order in which boot entries are created, nor does it provide any mechanism for controlling the boot order when the program runs. These details are determined by the order in which the program locates BOOT.CSV files. Thus, if you have multiple boot loaders with BOOT.CSV files, you’ll end up with an essentially random boot loader selected as the default. With any luck, you’ll be able to adjust the boot order with efibootmgr, EasyUEFI, or some other program once the system has booted. If your computer completely forgets its boot entries on every boot, though, your best bet is likely to be to delete all the BOOT.CSV files except for the one associated with the boot program you want to control the computer.
Transferring a sizeable file or a large number of small files can be time-consuming. While 10 Gigabit Ethernet can reduce the overall transfer times on Windows systems, this can be harder to achieve with Mac systems.
QNAP Thunderbolt NAS is the perfect solution for Thunderbolt-equipped Mac & Windows users with 4K workflow, file storage, and backup needs. QTS (QNAP NAS operating system) supports Thunderbolt networking that connects your NAS to other systems as an Ethernet connection. Each Thunderbolt connection can cascade (daisy-chain) up to six devices (storage devices and computers) through a single port without needing a hub or switch. Thunderbolt as an Ethernet connection is compatible with all network services (such as file sharing, FTP, and other services). This tutorial provides an overview of how to set up a Thunderbolt network between the NAS and your computers.
Note:
The number of Thunderbolt interfaces varies by NAS model.
Check with the device manufacturer to determine if the device supports Thunderbolt daisy-chaining.
The total number of connections in a daisy-chain will affect overall performance.
Mac OS X El Capitan 10.11 or later is required.
Set up Thunderbolt networking on the NAS
1. Open Qfinder Pro to find your NAS, and double-click on it to open its login page. Qfinder Pro is a utility for Windows, Mac, and Linux that allows you to quickly find and access a QNAP NAS over a LAN. Please follow this link to download Qfinder Pro: QNAP Utilities.
2. Log into the NAS as an administrator. Go to “Main Menu” > “Network & Virtual Switch” > “Interfaces” > “Thunderbolt”.
Click “Edit” under “Thunderbolt Bridge Address” to configure Thunderbolt’s network settings.
Thunderbolt will automatically assign IP addresses by default. If your network environment requires static IP addresses, choose “Use static IP address” (if you use iSCSI, NFS, or other file sharing services to mount network drives, use a static IP address for greater reliability).
After applying the settings, you should see the correct IP address for the Thunderbolt port. To check the connection status, you can go to “System Settings” > “System Status” and select the “Network Status” tab.
To set the network preferences of the Thunderbolt ports on your Mac, go to “Apple menu” > “System Preferences” > “Network”, and select “Thunderbolt Bridge” from the services list. By default, computers using Thunderbolt in a network environment automatically receive an IPv4 address using DHCP. If you have set a static IP address, you should manually configure the IP address accordingly. Refer to “Manually set Thunderbolt IP addresses” for more information.
Set up file sharing and access shared items on a network
QNAP NAS offers various forms of file service so that other operating systems can connect to your NAS with built-in tools or common application programs. Forms of file service include:
AFP (Apple Filing Protocol)
NFS (Network File System)
SMB/CIFS (Microsoft File Sharing)
File Transfer Protocol (FTP)
WebDAV
To share with other computers, simply turn on the service you want to use in “Network Services” (in “Control Panel”) on the NAS, and then use one of the following methods to connect to your NAS from your Mac: “Network Drives” in Qfinder Pro, “Network”, and “Connect to Server” in the Go menu of Apple Finder.
Use Qfinder Pro
1. Open Qfinder Pro and select “Network Drives”.
2. Choose the protocol, and enter the name of the folder to mount. If you do not specify the shared folder name, you can choose it after you enter your username and password.
3. Enter your username and password for the NAS.
4. Select the folders that you would like to access. Make sure you have the access privileges to the shared folders.
5. The connected folders will show up in Finder.
Use “Network” in the Go menu
The Network function displays whatever is available on your network in the Finder window. You may need to enable the Bonjour service first. Bonjour is a TCP/IP-based advertising and discovery protocol used by Macs. By enabling Bonjour, available services such as file sharing, printers, and remote speakers (used by iTunes and Apple TV) will be advertised throughout the network.
You can enable Bonjour from “Control Panel” > “Network Services” > “Service Discovery” > “Bonjour”.
1. On your Mac, go to “Finder” > “Go”, and then select “Network”.
2. Select the IP address of the Thunderbolt port of the NAS.
3. Select the folders that you would like to access.
4. The connected folders will show up in the Shared section of any Finder window.
Use “Connect to Server” in the Go menu
Use the “Connect to Server” feature to directly connect to the NAS. For example, you can connect to Microsoft File Sharing (SMB) offered by the NAS.
You can enable Microsoft File Sharing (SMB) from “Control Panel” > “Network Services” > “Win/Mac/NFS” > “Microsoft Networking”.
1. Select “Go” > “Connect To”, and enter a URL, IP address or DNS name.
2. Type the network address for the computer in the Server Address field using one of these formats:
If you do not specify the shared folder as part of the address, you can choose it after you enter your username and password.
3. Follow the onscreen instructions to enter your username and password. You should have access privileges to the shared folders. To make it easier to connect to the computer in the future, select “Remember this password in my keychain”.
4. Choose the shared folder you want to access.
5. The shared folder icon should appear in the Finder window sidebar or on your desktop.
Obtain the Thunderbolt IP address
There are two ways to obtain the IP address of the Thunderbolt port of the NAS as illustrated below:
Use the LCD display. Press “Select” to show the Thunderbolt port’s IP address.
Log into the NAS as an administrator. Go to “Main Menu” > “Network & Virtual Switch” > “Interfaces” > “Thunderbolt” and then check the IP address under “Thunderbolt Bridge Address”.
Manually set Thunderbolt IP addresses
You may need to use a static IP address for Thunderbolt Networking in your network environment. Here is how to set it up.
1. Log into the NAS as an administrator. Go to “Main Menu” > “Network & Virtual Switch” > “Interfaces” > “Thunderbolt”.
2. Click “Edit” under “Thunderbolt Bridge Address” to configure Thunderbolt’s network settings.
3. Click “Apply” when finished.
4. You need to change the IP address on your Mac accordingly. On your Mac, go to “Apple menu” > “System Preferences” > “Network” and select “Thunderbolt Bridge” in the network connection services list. Here you should choose “Manually” from the “Configure IPv4” pop-up menu and configure an IP address in the same subnet as your NAS.
I’ve been working on implementing Windows 10 at a company. They wanted to import a photo of all the users to the Active Directory, and have all the other systems pull the pictures from it. I primarily focused on Windows clients, Lync and SharePoint.
Goal
Our goal is to have Windows 8 and 10 clients pull the pictures from Active Directory to the users local profiles.
1. Importing the pictures to Active Directory
Now there are several approaches for this. Getting the pictures into AD I prefer using PowerShell. If you’re more into GUI style I can recommend this AD Photo Edit.
2. Create the required scripts
You need a (startup) script to download the data from Active Directory and convert them to JPEG-files. The script then proceeds to set these images as your local users profile picture/tile.
The PowerShell-script I’m using was originally written by Jordan. I modified it for better functionality and to make it work better with Windows 10.Set-ADPicture.ps1PowerShell
<#
.SYNOPSIS
Set-ADPicture.ps1
Written by Joakim at Jocha AB, http://jocha.se
.DESCRIPTION
Version 1.3 - Updated 2016-02-13
This script downloads and sets the Active Directory profile photograph and sets it as your profile picture in Windows.
Remember to create a defaultuser.jpg in \\domain\netlogon\

2016-02-13 : Slightly adjusted.
2015-11-12 : Added all picture sizes for Windows 10 compatibility.
#>

[CmdletBinding(SupportsShouldProcess=$true)]Param()
function Test-Null($InputObject) { return !([bool]$InputObject) }

# Get sid and photo for current user
$user = ([ADSISearcher]"(&(objectCategory=User)(SAMAccountName=$env:username))").FindOne().Properties
$user_photo = $user.thumbnailphoto
$user_sid = [System.Security.Principal.WindowsIdentity]::GetCurrent().User.Value

# Continue if an image was returned
If ((Test-Null $user_photo) -eq $false) {
    Write-Verbose "Photo exists in Active Directory."
}
# If no image was found in profile, use one from network share.
Else {
    Write-Verbose "No photo found in Active Directory for $env:username, using the default image instead"
    $user_photo = [byte[]](Get-Content "\\$env:USERDNSDOMAIN\NETLOGON\defaultuser.jpg" -Encoding byte)
}

# Set up image sizes and base path
$image_sizes = @(32, 40, 48, 96, 192, 200, 240, 448)
$image_mask = "Image{0}.jpg"
$image_base = "C:\ProgramData\AccountPictures"

# Set up registry
$reg_base = "HKLM:\SOFTWARE\Microsoft\Windows\CurrentVersion\AccountPicture\Users\{0}"
$reg_key = [string]::format($reg_base, $user_sid)
$reg_value_mask = "Image{0}"
If ((Test-Path -Path $reg_key) -eq $false) { New-Item -Path $reg_key }

# Save images, set reg keys
Try {
    ForEach ($size in $image_sizes) {
        # Create hidden directory, if it doesn't exist
        $dir = $image_base + "\" + $user_sid
        If ((Test-Path -Path $dir) -eq $false) { $(mkdir $dir).Attributes = "Hidden" }

        # Save photo to disk, overwrite existing files
        $file_name = ([string]::format($image_mask, $size))
        $path = $dir + "\" + $file_name
        Write-Verbose "  saving: $file_name"
        $user_photo | Set-Content -Path $path -Encoding Byte -Force

        # Save the path in registry, overwrite existing entries
        $name = [string]::format($reg_value_mask, $size)
        $value = New-ItemProperty -Path $reg_key -Name $name -Value $path -Force
    }
}
Catch {
    Write-Error "Cannot update profile picture for $env:username."
    Write-Error "Check prompt elevation and permissions to files/registry."
}
To make this script run hidden I resolved to creating a VBs wrapper that would silently execute the scriptSet-ADPicture.vbsVisual Basic
'
' Title:  Set-ADPicture.vbs
' Author: Joakim at Jocha AB, http://jocha.se
' Modified: 2016-02-13
'
On Error Resume Next
command = "powershell.exe -Noninteractive -ExecutionPolicy Bypass -Noprofile -File \\domain.local\NETLOGON\Set-ADPicture.ps1"
set shell = CreateObject("WScript.Shell")
shell.Run command,0
Now put both these scripts in your NETLOGON-folder (ie. \\domain.local\NETLOGON).
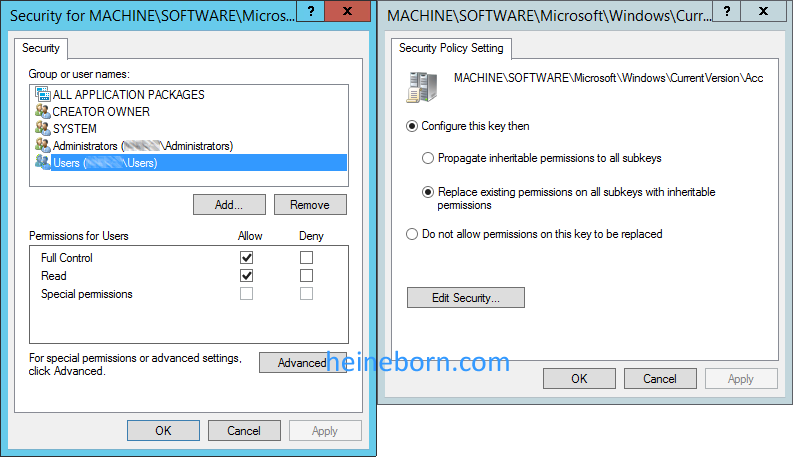
3. Setting up the GPO
Open the Group Policy Management Console and create a new GPO. Lets call it “Pictures”.
Give Full Permission on this key (and sub keys) to <Domain>\Users. Also make sure you have selected Replace Existing permission on all sub keys with inheritable permissions. Otherwise the script will not be able to update the necessary registry values.
4. Setting up the Task schedule
To run the function there are a couple of different approaches. You could either execute it from the “Logon Scripts” function in a Group policy or via Task Scheduler for example. Since you probably know how to set up a logon script, I’ll demo how to set up a scheduled job…
In the same Group Policy object as above, go to:
User Configuration > Preferences > Control Panel Settings > Scheduled Tasks
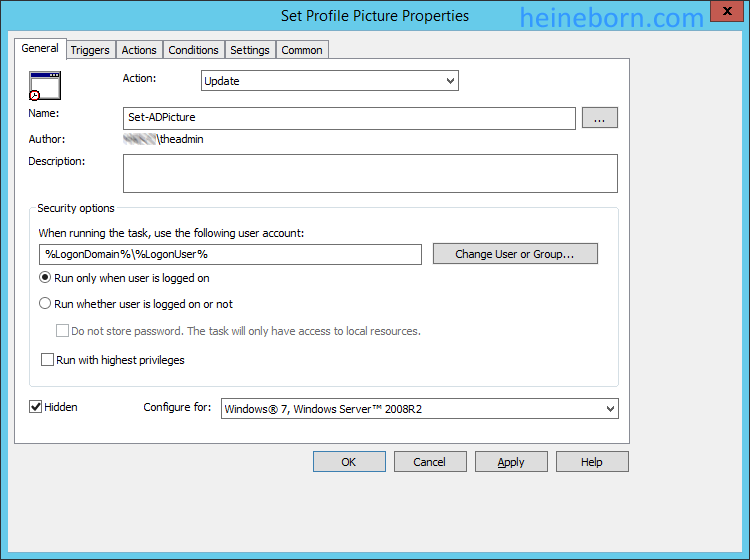
Right Click and select New Sheduled Task (At lest Windows 7) option.
Under the General tab Set Name as: Set-ADPicture
Under the General tab, set name to: Set-ADPicture
Under the Triggers tab, create a new trigger and select Begin the task: At Login, Any User
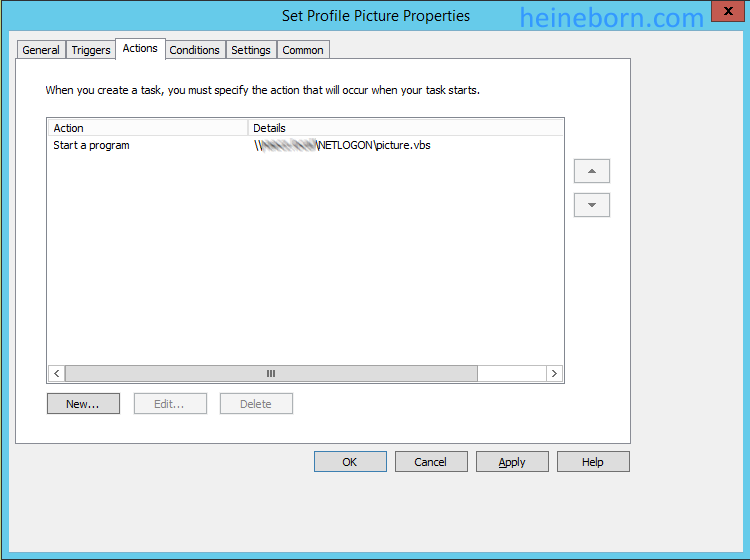
Under the Actions tab: Create New Action Select Action “Start Program”. From Program Script Option. Select the VBs-script from NETLOGON.
Under the Conditions tab: I prefer to enable Start only if the following network connection in available to make sure it does not waste resources if disconnected from the network.
5. Target the GPO
All the settings are now set. Go back to the Group Policy console and create your target links to the proper OUs.
Please let me know if I’ve missed something or if its not working for you.
Network-Attached-Storage (NAS) devices are great for local backups and archives of data. They have become even more capable, now often taking over functions that used to be reserved for servers.
QNAP produces a popular line of networking products, including NAS units that can work with Macintosh, Windows, Linux, and other OS’s. QNAP’s NAS products are used in office, home, and professional environments for storage and a variety of applications, including business, development, home automation, security, and entertainment.
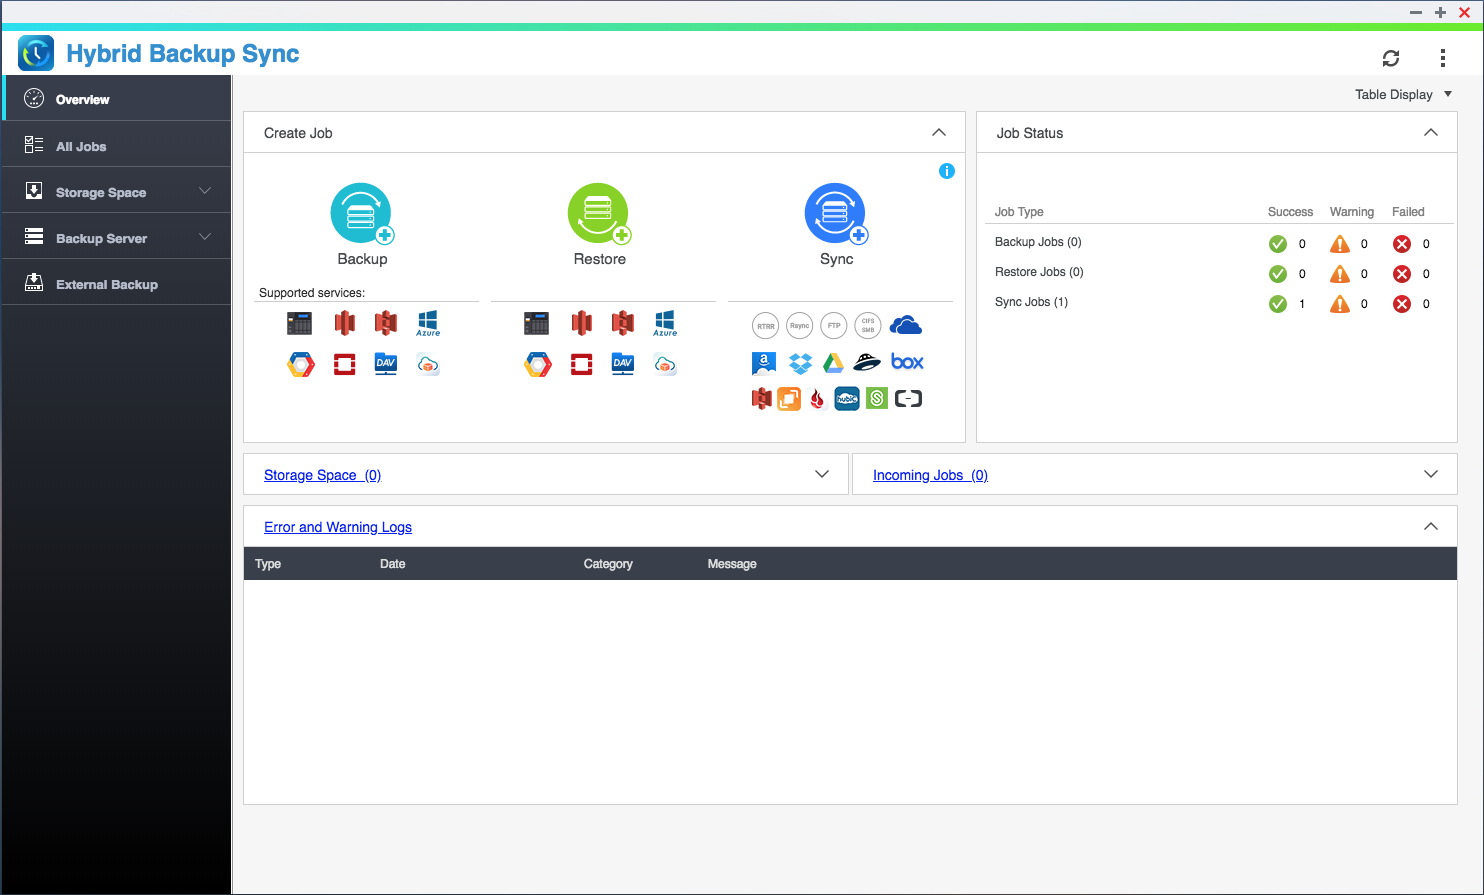
Data stored on a QNAP NAS can be backed up to Backblaze B2 Cloud Storage using QNAP’s Hybrid Backup Sync application, which consolidates backup, restoration and synchronization functions into a single QTS application. With the latest releases of QTS and Hybrid Backup Sync (HBS), you can now sync the data on your QNAP NAS to and from Backblaze B2 Cloud Storage.
How to Set up QNAP’s Hybrid Backup Sync to Work With B2 Cloud Storage
To set up your QNAP with B2 sync support, you’ll need access to your B2 account. You’ll also need your B2 Account ID, application key and bucket name — all of which are available after you log into your Backblaze account. Finally, you’ll need the Hybrid Backup Sync application installed in QTS on your QNAP NAS. You’ll need QTS 4.3.3 or later and Hybrid Backup Sync v2.1.170615 or later.
Open the QTS desktop in your web browser.
If it’s not already installed, install the latest Hybrid Backup Sync from the App Center.
Click on Hybrid Backup Sync from the desktop.
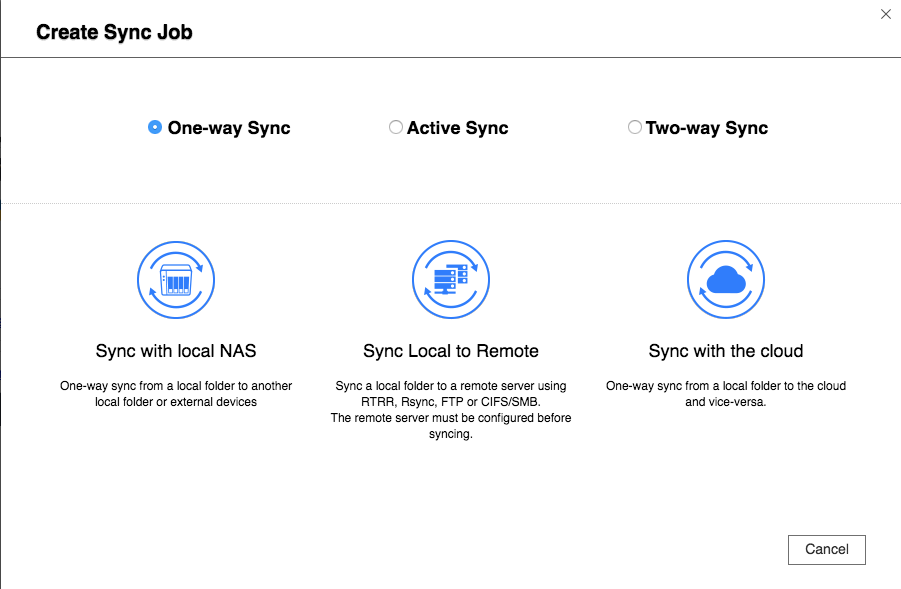
Click the Sync button to create a new connection to B2.
Select “One-way Sync” and “Sync with the cloud.” Other options are also available.
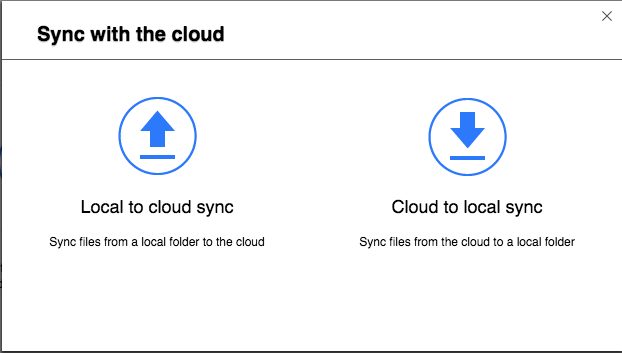
Select “Local to cloud sync.”
Select an existing Account (job), or just select “Backblaze B2” to create a new one.
Enter a display name for this job, and an Application Key ID and Application Key for the Backblaze B2 account. This Application Key needs to have full read/write permissions for the bucket or section of the bucket the QNAP will access.
Select the source folder on the NAS you’d like to sync, and the bucket name and folder name on B2 for the destination. If you’d like to sync immediately, select the “Sync Now” checkbox. Click “Advanced Settings” if you’d like to configure a backup schedule, select client-side encryption, compression, filters, file replacement policies, and other options. Click “Apply.” If you selected “Sync Now,” your job will start.
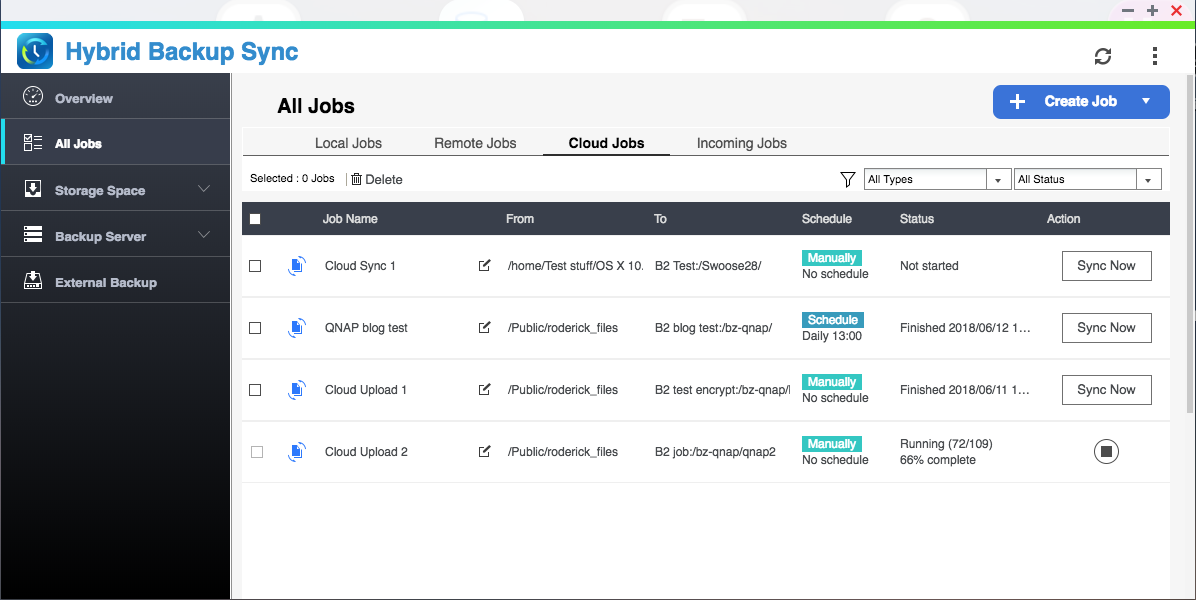
After you’ve finished configuring your job, you will see the “All Jobs” dialog with the status of all your jobs.
What You Can Do With B2 and QNAP Hybrid Backup Sync?
The Hybrid Backup Sync app provides you with total control over what gets backed up to B2. You can synchronize in the cloud as little or as much as you want. Here are some practical examples of what you can do with Hybrid Backup Sync and B2 working together.
1 — Sync the Entire Contents of your QNAP to the Cloud
The QNAP NAS has excellent fault-tolerance — it can continue operating even when individual drive units fail — but nothing in life is foolproof. It pays to be prepared in the event of a catastrophe. If you follow our 3-2-1 Backup Strategy, you know how important it is to make sure that you have a copy of your files in the cloud.
2 — Sync Your Most Important Media Files
Using your QNAP to store movies, music and photos? You’ve invested untold amounts of time, money, and effort into collecting those media files, so make sure they’re safely and securely synced to the cloud with Hybrid Backup Sync and B2.
3 — Back Up Time Machine and Other Local Backups
Apple’s Time Machine software provides Mac users with reliable local backup, and many of our customers rely on it to provide that crucial first step in making sure their data is secure. QNAP enables the NAS to act as a network-based Time Machine backup. Those Time Machine files can be synced to the cloud, so you can make sure to have Time Machine files to restore from in the event of a critical failure.
If you use Windows or Linux, you can configure the QNAP NAS as the destination for your Windows or Linux local data backup. That, in turn, can be synced to the cloud from the NAS.
If you haven’t given B2 a try yet, now is the time. You can get started with B2 and your QNAP NAS right now, and make sure your NAS is synced securely and automatically to the cloud.


